added 35 characters in body
Source Link

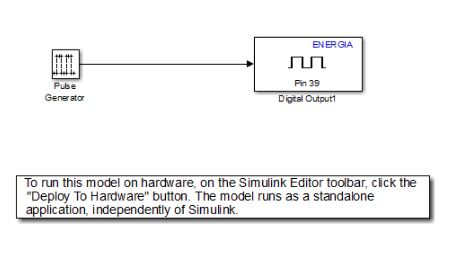
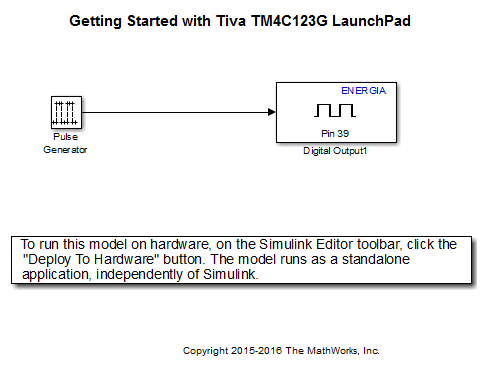
GPIOGPIO stands for General Purpose Input OutputGeneral Purpose Input Output. Lets assume you want to generate a pulse at pin 39 as in the below image. So when you wire the pulse to pin 39. The the underline codesoftware will creategenerate the necessary code to configure the pin 39 to be an output pin enabling the pin to output a pulse.

enter image description here

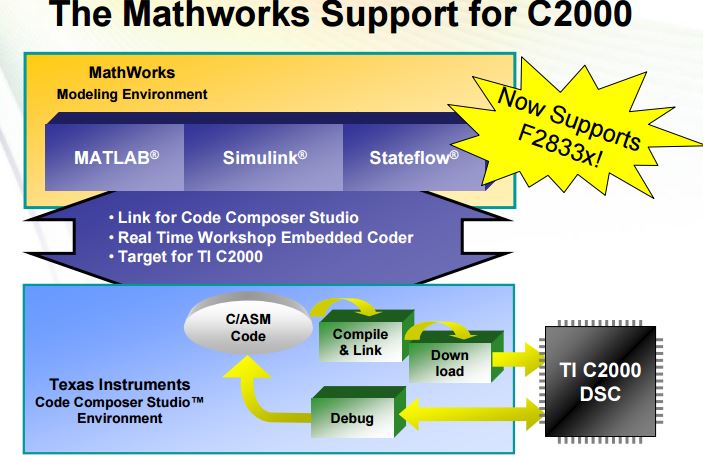
Below is the code stack between Simulink and Microcontroller. So when you create a Digital Output block the software will essentially convert and configure your Digital Output block into a Digital output pin. The code will convert into binary code to be able to loaded into the micro controller. Below is a high level diagram that explains the process.

enter image description here


References:

GPIO stands for General Purpose Input Output. Lets assume you want to generate a pulse at pin 39 as in the below image. So you wire the pulse to pin 39. The underline code will create necessary code to configure the pin 39 to be output pin enabling the pin to output pulse.

enter image description here

Below is the code stack between Simulink and Microcontroller. So when you create a Digital Output block the software will essentially convert and configure your Digital Output block into a Digital output pin. The code will convert into binary code to be able to loaded into the micro controller. Below is a high level diagram that explains the process.

enter image description here


References:

GPIO stands for General Purpose Input Output. Lets assume you want to generate a pulse at pin 39 as in the below image. So when you wire the pulse to pin 39 the underline software will generate the necessary code to configure pin 39 to be an output pin enabling the pin to output a pulse.

enter image description here

Below is the code stack between Simulink and Microcontroller. So when you create a Digital Output block the software will essentially convert and configure your Digital Output block into a Digital output pin. The code will convert into binary code to be able to loaded into the micro controller. Below is a high level diagram that explains the process.

enter image description here


References:

added 785 characters in body
Source Link

GPIO stands for General Purpose Input Output. Lets assume you want to generate a pulse at pin 39 as in the below image. So you wire the pulse to pin 39. The underline code will create necessary code to configure the pin 39 to be output pin enabling the pin to output pulse.

enter image description hereenter image description here

Below is the code stack between Simulink and Microcontroller. So when you create a Digital Output block the software will essentially convert and configure your Digital Output block into a Digital output pin. The code will convert into binary code to be able to loaded into the micro controller. Below is a high level diagram that explains the process.

enter image description here


References:

GPIO stands for General Purpose Input Output. Lets assume you want to generate a pulse at pin 39 as in the below image. So you wire the pulse to pin 39. The underline code will create necessary code to configure the pin 39 to be output pin enabling the pin to output pulse.

enter image description here

Below is the code stack between Simulink and Microcontroller. So when you create a Digital Output block the software will essentially convert and configure your Digital Output block into a Digital output pin. The code will convert into binary code to be able to loaded into the micro controller. Below is a high level diagram that explains the process.

enter image description here


References:

Source Link

GPIO stands for General Purpose Input Output. Lets assume you want to generate a pulse at pin 39 as in the below image. So you wire the pulse to pin 39. The underline code will create necessary code to configure the pin 39 to be output pin enabling the pin to output pulse.

enter image description here